
Since UVM is object oriented, the UVM testbench will be written
using 'classes'. Each class will be derived
from one or the above base classes shown in the diagram above
for example:
class ahb_test extends
uvm_test;
class ahb_env extends
uvm_env;
class ahb_magent extends
uvm_agent;
class ahb_mtran
extends uvm_sequence_item;
class ahb_msequence
extends uvm_sequence;
class ahb_mtran
extends uvm_sequence_item;
and
so on and so fourth.
The
structure of the UVM TB.
The basic structure of the UVM TB can be seen in the diagram
below:
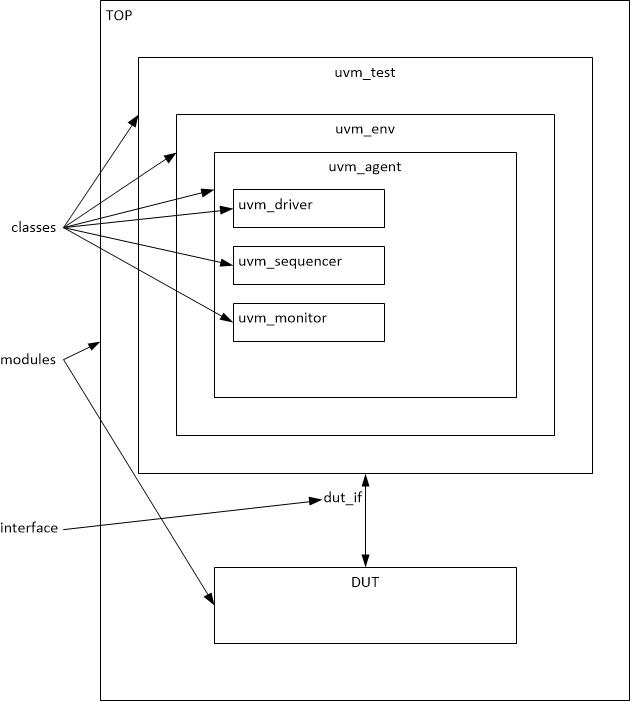
As indicated previously, the UVM TB in this tutorial will only
deal with stimulus generation,
some of the components such as Monitor, scoreboard will not be
included in our TB code.
The
hierarchy of the components shown in the above diagram is defined
by the UVM standard.
All testbenches which claim to be UVM compliant must have the
above hierarchy, and components.
Driver : Receives
transactions from the Sequencer, and drives it following some
protocol
(here in our case AHB protocol), to the DUT pins.
The driver may not drive the DUT pins directly. Usually a driver
drives the pins of
what is called an 'virtual interface'.
Virtual Interface is actually a pointer to actual interface.
This
virtual interface pointer is then mapped to actual
DUT interface. This helps because the driver does not need to know
about actual interface
it will drive, i.e. it is independent to actual verilog interface.
Though the virtual interface
and actual interface it will eventually drive must be of the same
'type'. This helps to De-couple
the verification IP design from actual RTL. The VIP now can be
written using a virtual
interface. The user of the VIP will then map this virtual
interface to actual DUT interface.
How the virtual interface is mapped to actual interface will be
seen a bit later.
Note:
The code for driver isn't directly available. To download the
driver code, you will
have to download the whole tutorial code by clicking here
and then providing your details.
Sequencer: Its job is to
send the transactions to the driver.
Monitor: its job is to sniff into
DUT pins, re-structure the sniffed information
and send the re-structured sniffed information to scoreboard.
Both Monitor and Scoreboard are not included in this tutorial.
Agent: This is a uvm
component which instantiates the Driver, Sequencer,
Monitor, as shown in the above diagram.
Env: This is uvm component
which instantiates the Agents. In our example,
there is only one agent instantiated, but an Env may instantiate
multiple agents.
Test:
This is the uvm component which instantiates the Env.
TOP:
This is the verilog top module which will call a method
'run_test()',
Notice that the run_test() has no args passed into it.
We could have used it has run_test("TESTNAME"), however we have
kept it
blank and we will pass the testname using the vcs command-line
instead.
run_test() does all the magic for us: This will initiate the
creation of the test object,
and cause it to run. It will actually create an instance of test
class given on the vcs command-line.
Example:
./simv -quiet +UVM_TESTNAME=test_all -gui
In
the above example, an instance of the test class 'test_all'
will be created and it will be run.
In
addition to run_test() method call the top verilog module will
also instantiate
a verilog interface. This is the interface which will be driven by
the UVM TB.
In our case the verilog code for this interface can be found here.
In order for the interface intantiated in the top verilog module
to be 'connected'
or driven by the UVM tb, a special method is adopted using what is
called
UVM configuration database.
You will notice the following lines of code in the TOP module
uvm_config_db #(virtual ahb_if)::set(null, "*","dut_vi_app_m0", ahb_if1);
This
above code line uses a method called 'set' which assigns a
name,value pair in
what is called as uvm configuration database. a name
'dut_vi_app_m0' has been
assigned to the interface ahb_if1()
You will also notice the following lines in the Env code.
assert (uvm_config_db #(virtual ahb_if)::get(this,"","dut_vi_app_m0",ahb_magent_h.dut_agent_vi));
This
above code line uses a method called 'get' to retrieve the
name,value pair from the configuration database,
In
short the interface ahb_if1 in the top module gets mapped to the
environments' agents' dut_agent_vi
This dut_agent_vi is then mapped to the driver's dut_vi.
The driver in turn drives the dut_vi, with the values it gets from
the transaction item it receives from the sequencer.
This is how UVM's driver is able to wiggle the pins in verilog
dut.
Sequence: Its to be noted
that its not a 'component'. Its classified just as 'data'. That is
why it has not been shown in the diagram above. It has no place in
the diagram, as the
diagram shows the hierarchy of uvm components.
It will usually have a 'body' method, which will define the
behavior of this sequence.